

Quería postear esto ayer, pero con tanta celebración me fue imposible, pero aun así espero hayan pasado un Feliz San Valentín! Para celebrarlo quiero compartir con ustedes este pequeño tutorial para hacer un sobre de Rilakkuma.
I wanted to post this yesterday, but with so many celebrations it was not possible, but anyway I hope you had a Happy Valentine's day! To celebrate it I want to share with you all a little tutorial to make a Rilakkuma Envelope.
Entonces empezemos! So let's start!
El archivo PDF con los moldes, lo encontrarán al final de la página.
You will find the PDF File with the patterns at the bottom of the page.
Materiales / Materials:
Fieltro / Felt
Hilo para coser / Sewing Thread
Remache / Sew on snap.
Regla / Ruler
Tijeras pequeñas / Embroidery scissors.
Papel mantequilla / Thin Tracing paper (Wax paper)
Opcional / Optional:
Marcador de tinta invisible / disappearing ink marker

Paso 1: Con una aguja perforar la orilla de los ojos. With a needle, pierce the line of the eyes.
Paso 2: Con una tijera pequeña remover el papel. With an embroidery scissor, remove the pieces of paper.
Paso 3: Con un marcador de preferencia de los que se desaparece la tinta, marcar a través de los agujeros de los ojos. Draw on the felt through the eyes holes using a disappearing ink marker.
Paso 4: Listo para bordar. Ready for the embroidery part.

Paso 5: Bordar la orilla de los ojos con punto atrás, hilo café oscuro. Sew the edge of the eyes using Back Stitch. (Dark Brown thread)
Paso 6: Rellenar con puntada de satín. Fill the eyes using Satin Stitch.

Paso 7: Bordar 3 líneas horizontales pequeñas para la nariz (hilo café oscuro) Sew 3 Horizontal Straight Stitches to make the nose.
Paso 8: Bordar 2 líneas en diagonal como se muestra en la ilustración. Sew 2 Diagonal Straight Stitches, as shown in the picture.

Paso 9: Bordar de la misma forma el otro lado para completar la boquita. Embroider in the same way the other side.
Paso 10: Coser el hocico a la cabeza usando puntada para apliques (Pequeñas puntadas en vertical) Applique Stitch the muzzle to the head.
Paso 11: Colocar la cabeza, el cuerpo y el corazón en su lugar, utilizamos una regla para evitar colocarlos en la solapa inferior. Place the body, head and the big heart in place, use a ruler to avoid placing them in the bottom flap.
Paso 12: De la misma forma debemos tener cuidado de no colocarlos en la aleta lateral. In the same way we must use the ruler to avoid placing them in the side flap.

Paso 13: Fijamos las partes con alfileres para evitar que se muevan. Pin the pieces to avoid they move.
Paso 14: Usamos puntada para apliques para coser el cuerpo. Applique Stitch the body.
Paso 15: Coser la cabeza, orejas y cola utilizando la misma puntada. Applique Stitch the head, ears and tail.
Paso 16: Coser en su lugar la parte interna de las orejas y el corazón. Sew in place the inner ears and the heart using Applique Stitch.

Paso 17: Colocar los corazones pequeños como se muestra. Place the little hearts as shown.
Paso 18: Coser los corazones con puntada para apliques. Colocamos el sello postal. Applique Stitch the little hearts. Place the postage stamp in place.
Paso 19: Cosemos el sello y encima le cosemos el corazón rosado palido. Applique Stitch the stamp and the pale pink heart.
Paso 20: Con un marcador de tinta invisible, dibujamoss lineas curvas sobre el sello. Using a disappearing ink marker, draw curved lines in the postage stamp.

Paso 21: Bordamos las líneas con punto atrás. Using Back Stitch, sew over the lines.
Paso 22: Calcar en papel mantequilla (seda o cebolla) las letras que vamos a bordar. Transfer the letters on thin tracing paper.
Paso 23: Sujetar el papel con alfileres. Pin the paper to the felt.
Paso 24: Bordar sobre el papel usando punto atrás. Embroider the letters using Back Stitch.
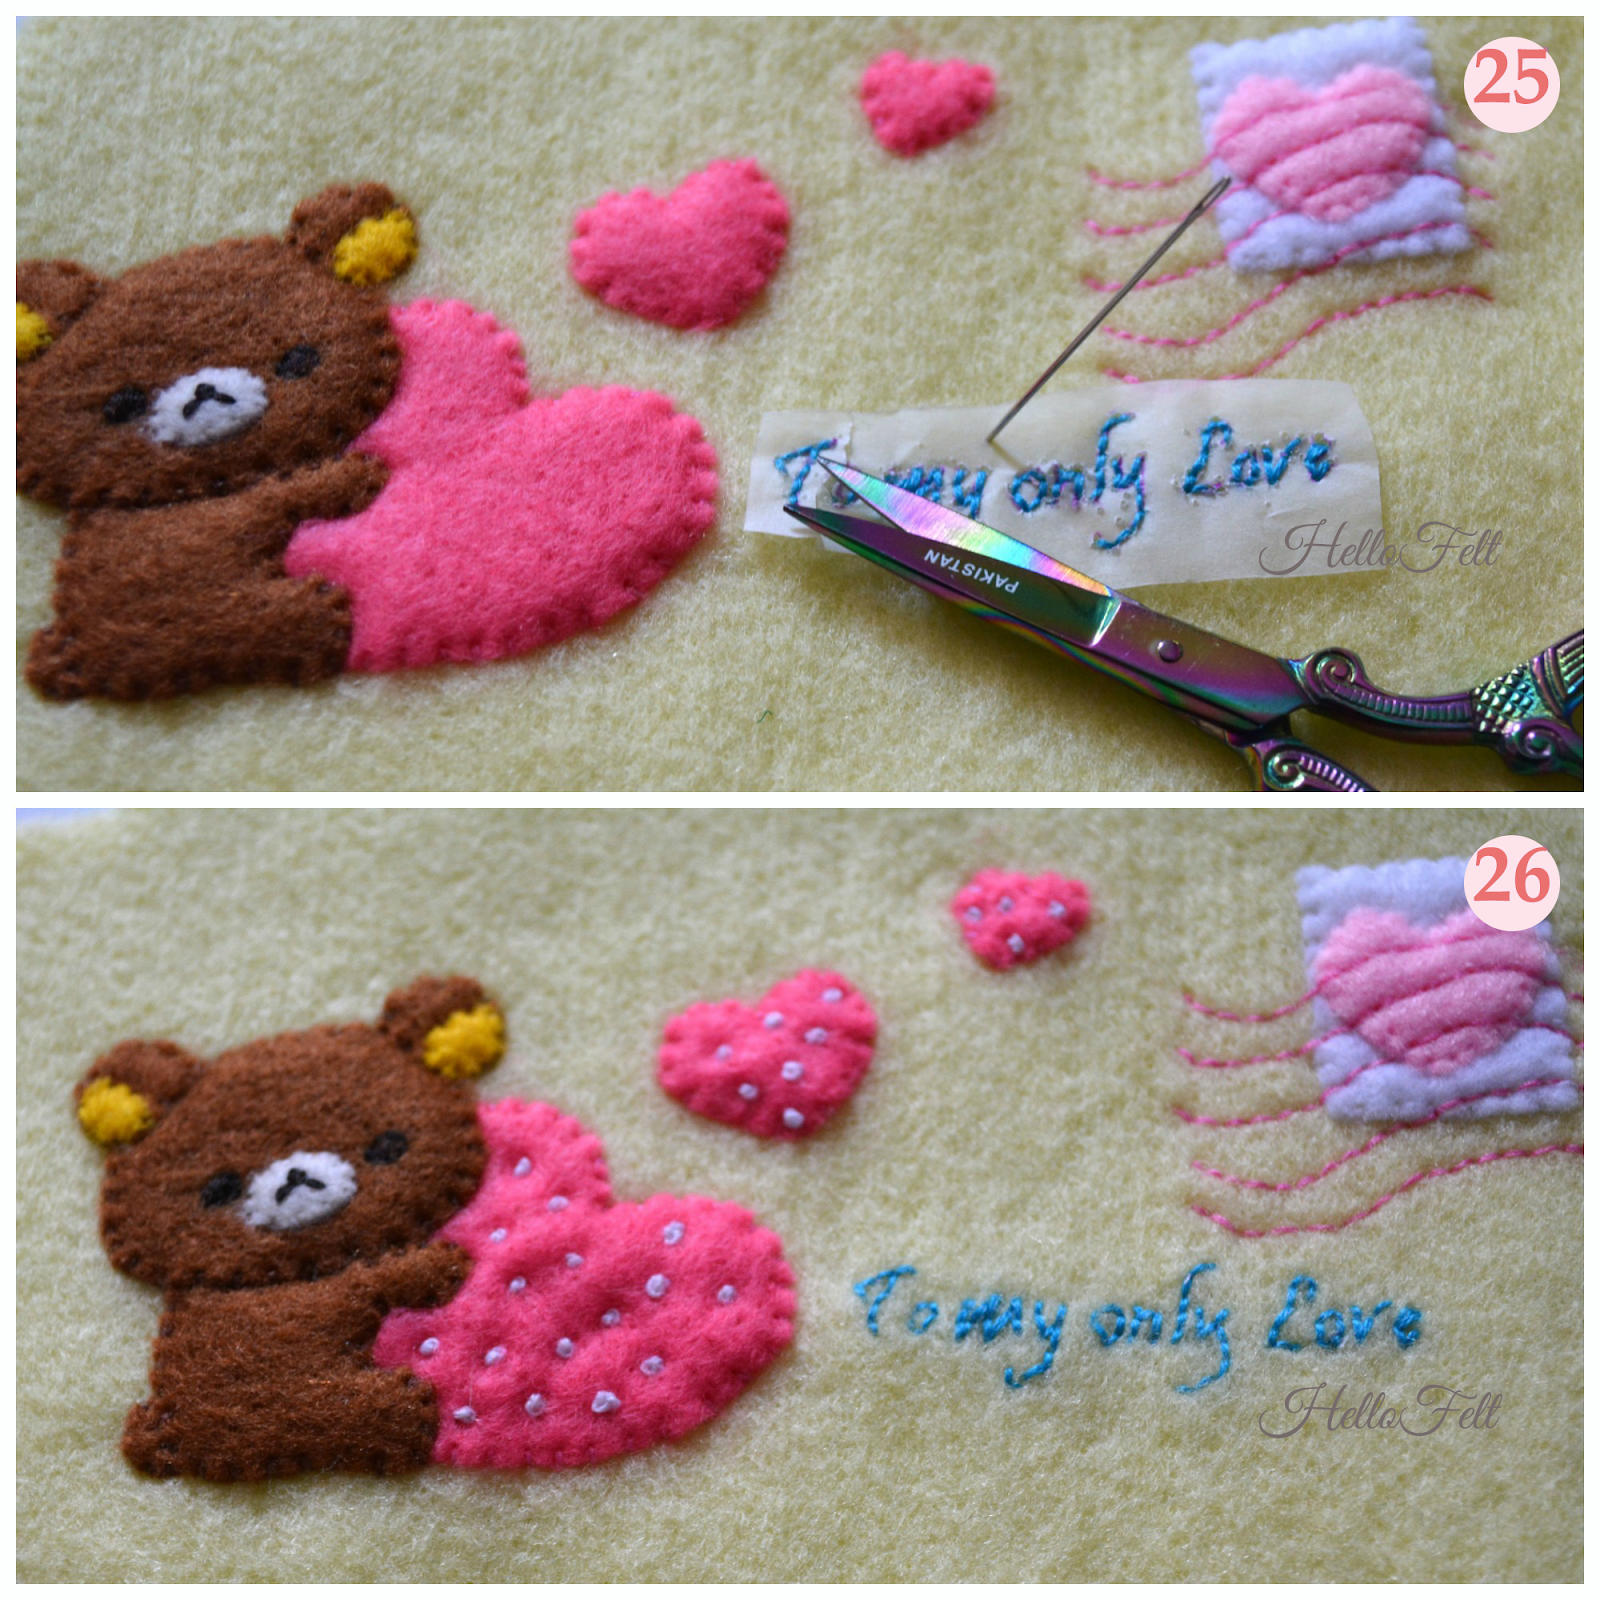
Paso 25: Al terminar el bordado, removemos cuidadosamente el papel con ayuda de tijeras pequeñas y una aguja. Gently pull the paper up and back, away from the stitching, using an embroidery scissors or a needle.
Paso 26: Bordado listo. Embroidery done.

Paso 27: Doblamos la aleta lateral y la sujetamos con un alfiler a la solapa inferior. Fold the side flap and pin it to the bottom flap.
Paso 28: Cosemos las dos partes usando punto atrás. Sew the two pieces together using Back Stitch.
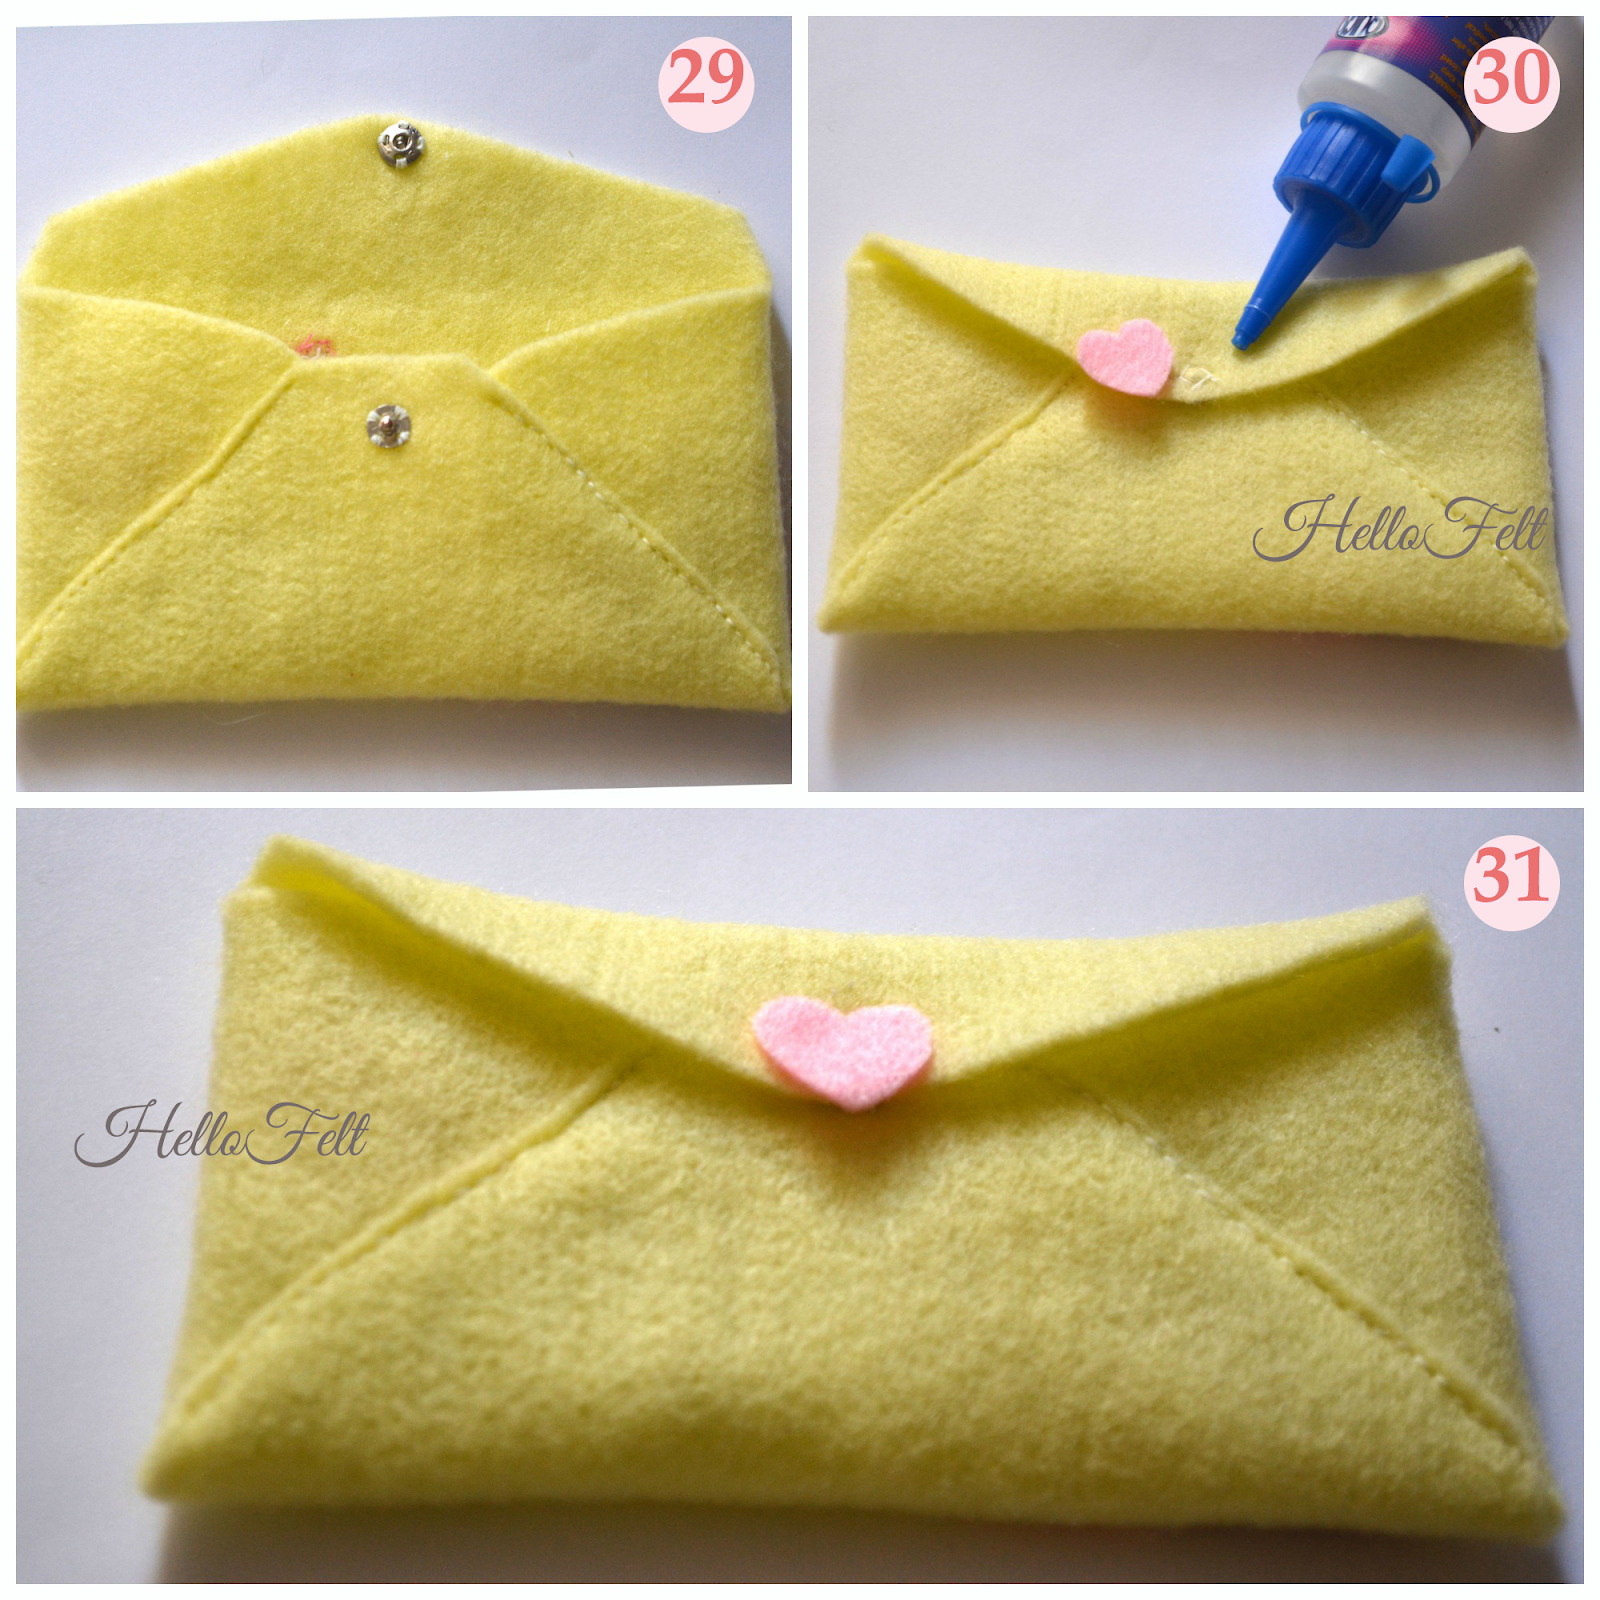
Paso 29: Repetimos el paso 27 y 28 con el otro lado. Agregamos el remache como se muestra. Repeat step 27 and 28 with the other side. Sew on the snaps as shown.
Paso 30: Con un poco de silicón frio pegamos el corazón a la costura del remache para que no se vea. Put a little bit of craft glue on the snap sewing and place the heart over it.
Paso 31: Listo! Done!

Ahora solo necesitan escribir una carta de amor, amistad o de lo que prefieran y listo! Espero que les haya gustado y que se diviertan haciendo este sobre. Me encantaría ver como quedan así que recuerden que pueden compartir sus fotos en mi página de Facebook.
Now you just need to write a love or friendship (or whatever you like) letter and it's done! I hope you like it and enjoy making it, remember I'd love to see how they turn out so share your pics on my facebook page.
.
Hasta la próxima! See you next time!
Fantastic! thank you for sharing.... I though I was the only one doing the embroidery with paper... great minds think alike!
ResponderBorrarThank you for your comment ♥ Yes, the embroidery with the paper is easier ♥ I'm glad you like my little tutorial!
Borrar