

¿A quien no le gustan los pandas? Son de mis animales favoritos, por eso cuando alguien me propuso hacer una bolsa con un panda, no me pude negar. Decidí tomarle fotos a los pasos mientras la hacía para poder compartirla con ustedes, espero que como a mi les guste tanto que no puedan evitar hacer una.
Who doesn't like pandas? They are one of my favorite animals, that's why when someone asked me to make a bag with a panda, I was not able to say not. I decided to take pics to the steps while I was making it to share it with you, I hope that you like it so much that you can't avoid making one.
Materiales / Materials:
Fieltro / Felt
Tela / Fabric
Hilo para coser / Sewing Thread
Remache / Sew on snap.
Tijeras pequeñas / Embroidery scissors.
Opcional / Optional:
Marcador de tinta invisible / disappearing ink marker
Antes de empezar deben descargar el archivo PDF con el molde e imprimirlo, trazar las partes en fieltro y cortarlas. Encontrarán el patrón al final de la página.
Before start you need to download the PDF file, print and cut out the template, trace them onto felt and cut them out. You will find the pattern at the bottom of the page.

Paso 1: Coser las esquinas en el frente y el lado de atrás de la bolsa.
Step 1: Overcast stitch the darts on front and back bag pieces.

Paso 2: Colocar el prado en el frente de la bolsa y asegurarlo con un alfiler. Coser utilizando puntada para apliques en la parte superior e inferior del prado, no coser a los lados.
Step 2: Place the meadow in the front bag piece and pin it, sew it using appliqué stitch, sew at the top and the bottom of the meadow but not to the sides.

Paso 3: Colocar la cabeza, el cuerpo y la cola del panda y sujetarlos con alfileres, coser usando puntada para apliques, antes de coser por completo el cuerpo colocar el brazo por debajo del cuerpo.
Step 3: Place the head, body and tail and pin them, sew using appliqué stitch, before sewing the body completely place the arm under the body.

Paso 4: Colocar los brazos, las piernas, el cuello y las orejas en su lugar, coser utilizando puntada para apliques.
Step 4: Place the arms, legs, neck and the ears, sew them using applique stitch.
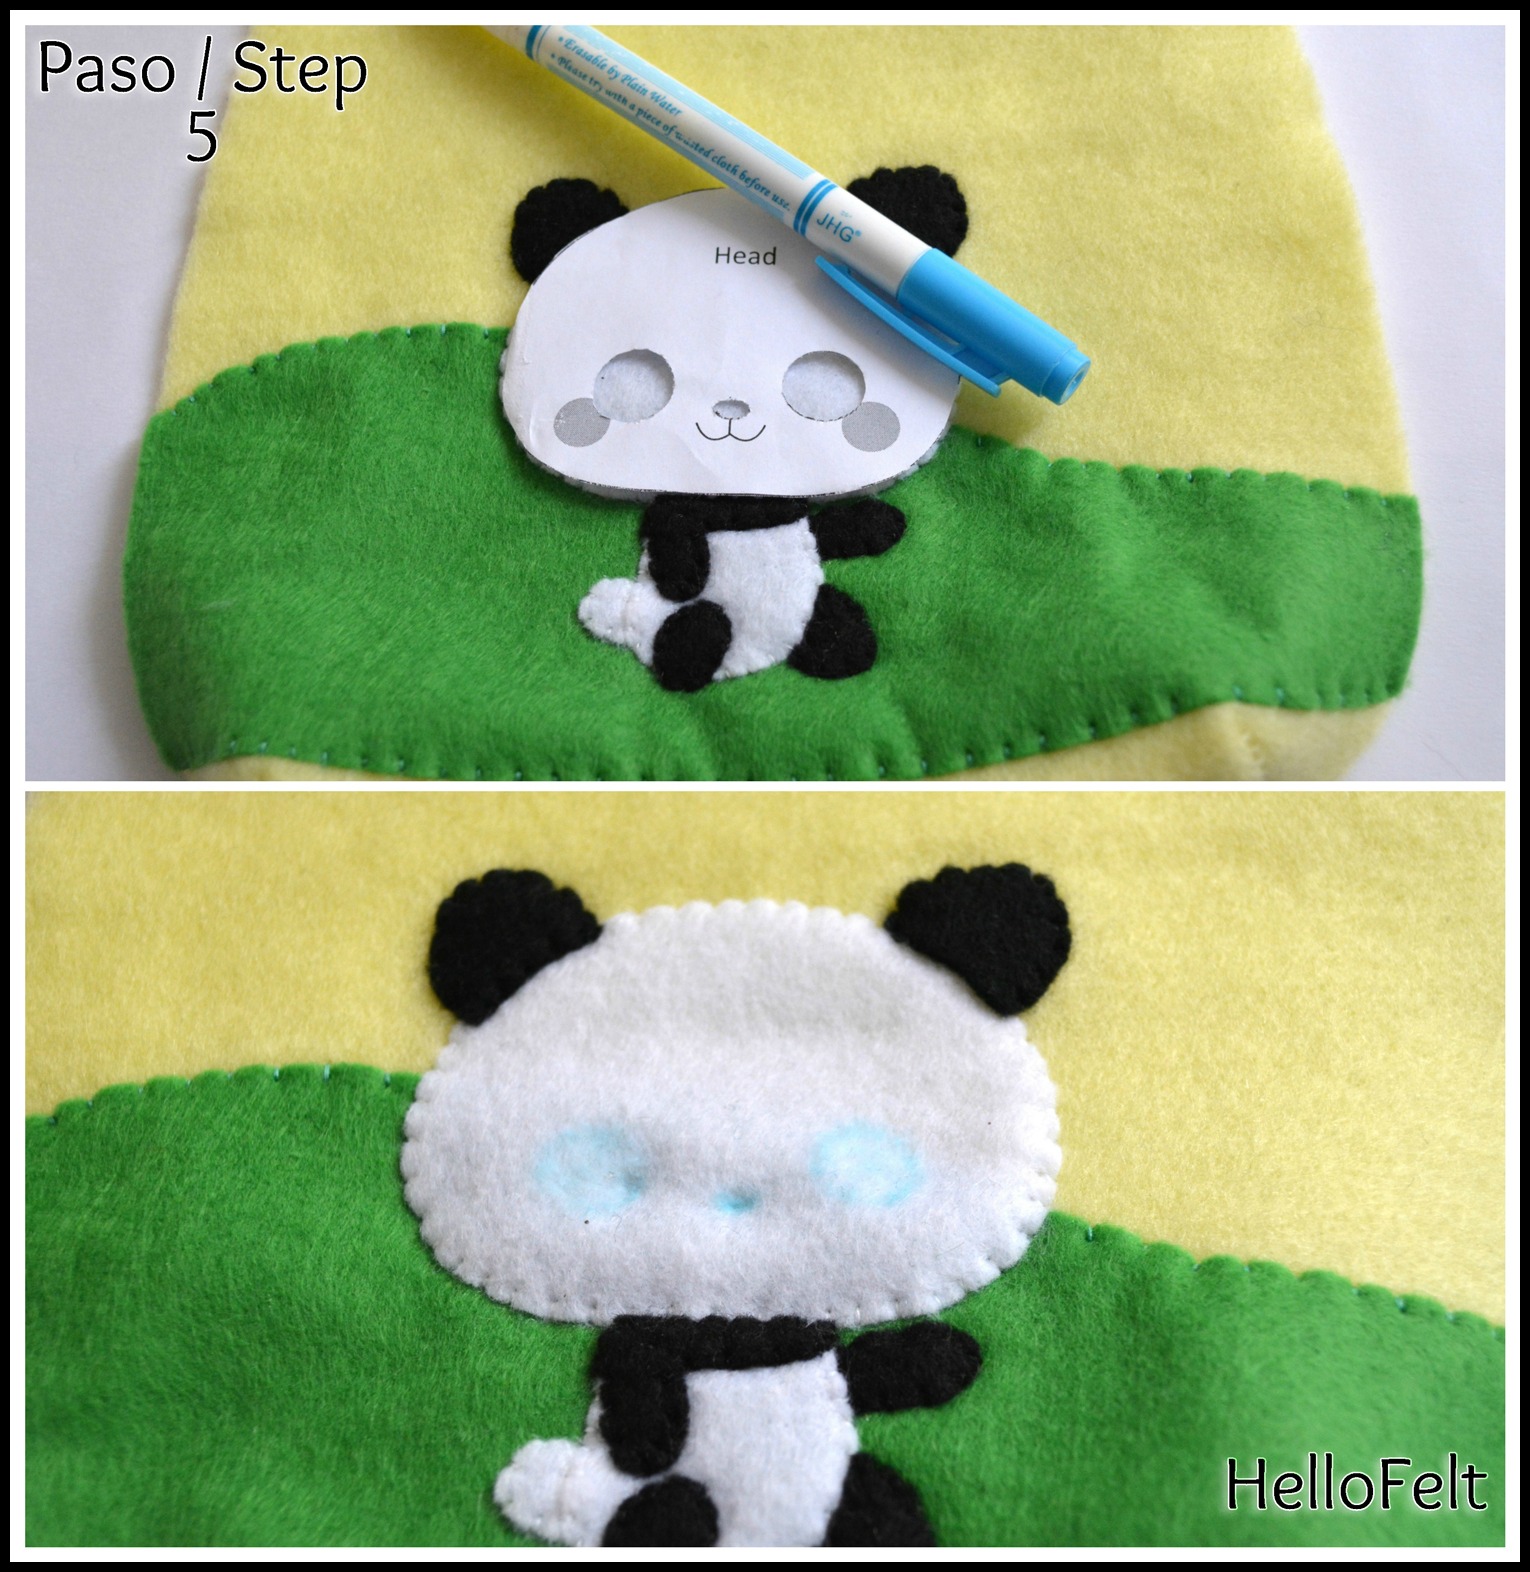
Paso 5: Dibujar a través del patrón los ojos y la nariz. En mi tutorial "Rilakkuma Envelope" del paso 1 al 4, hay más detalles de este paso.
Step 5: Draw through the template the eyes and the nose. You can find more details about this step in my tutorial " Rilakkuma Envelope".
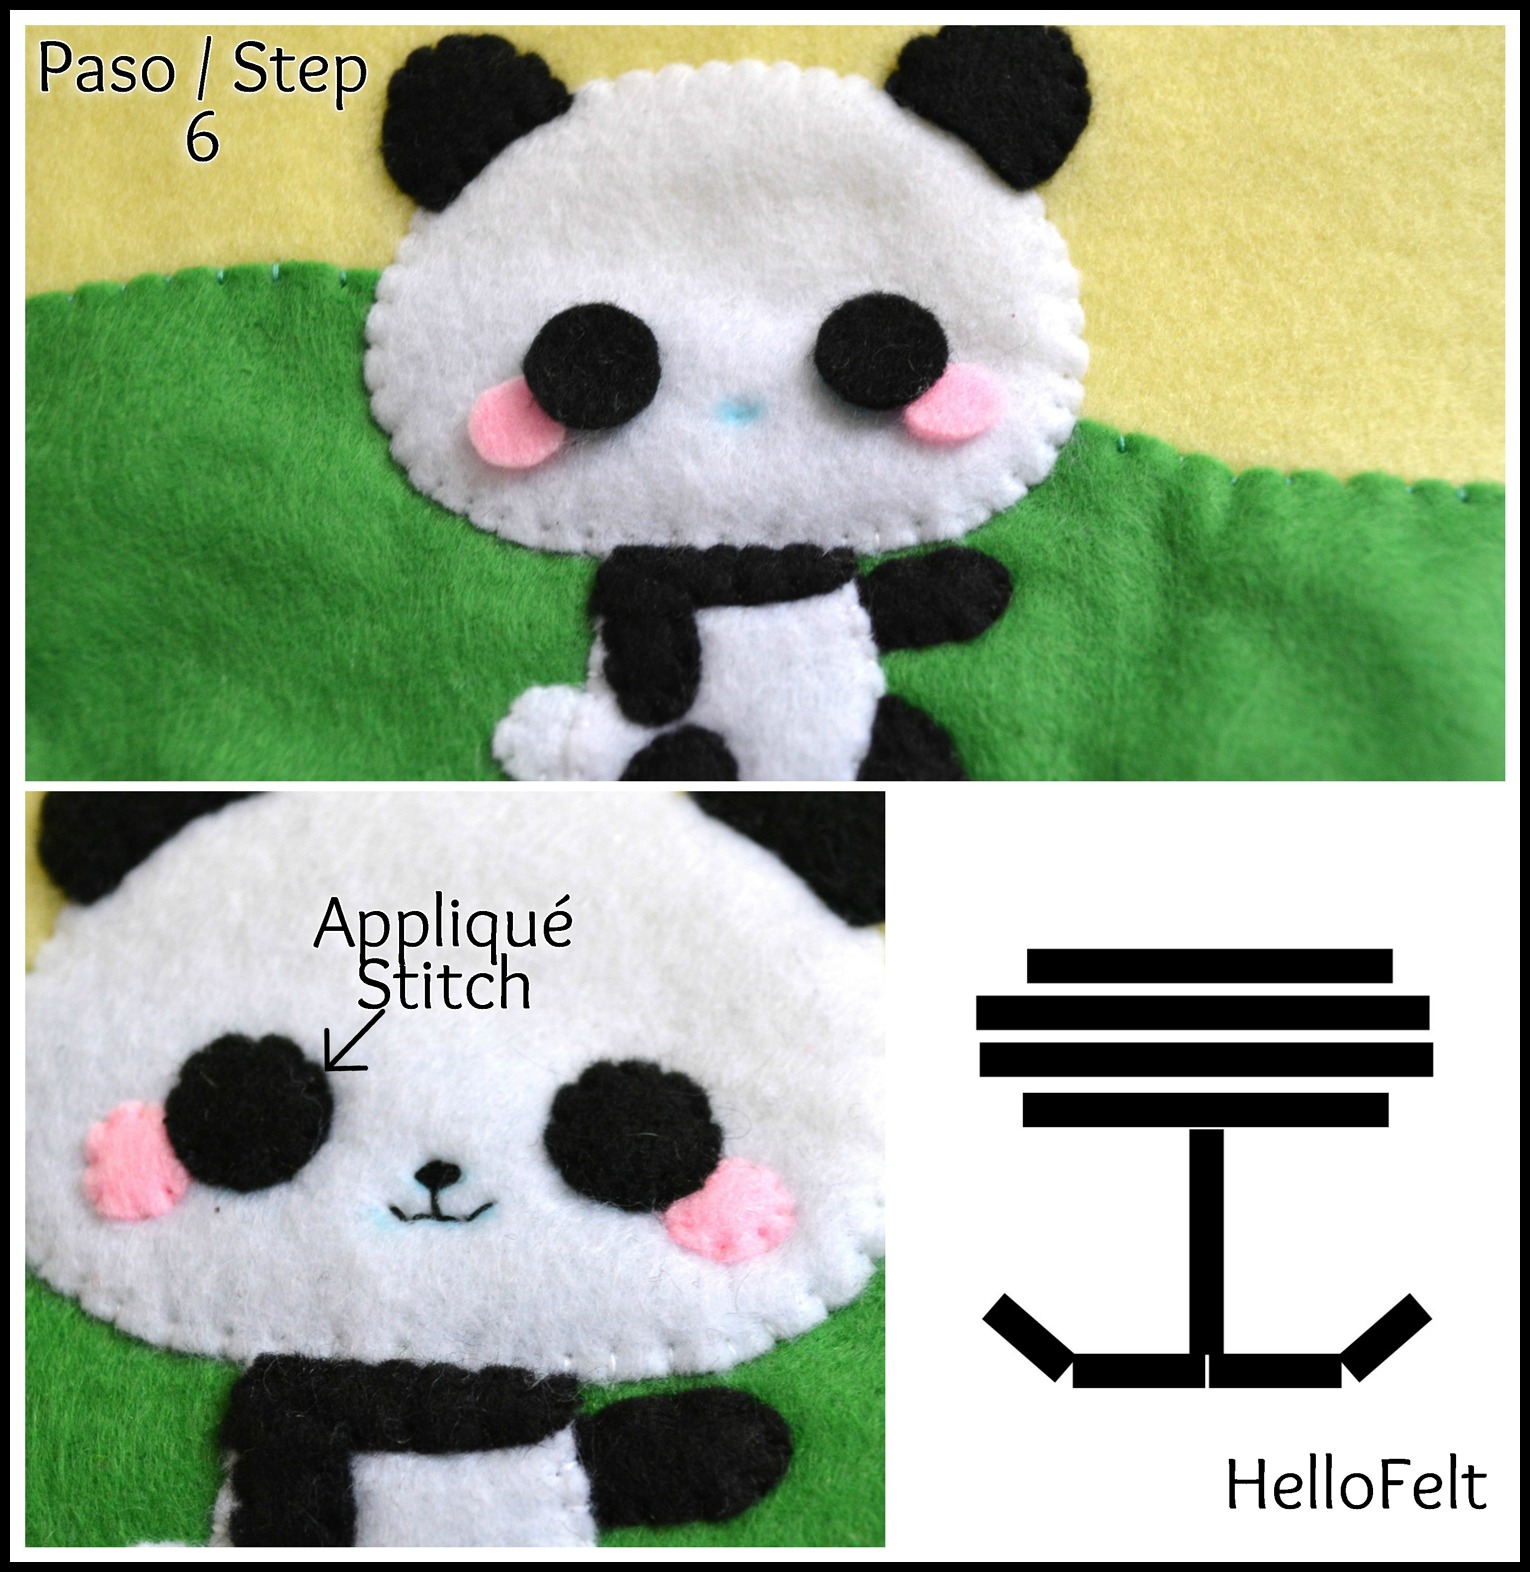
Paso 6: Colocar los ojos en su lugar y las chapitas debajo de los ojos, coser utilizando puntada para apliques. Coser la nariz usando puntadas rectas y coser la boca con punto atrás,
Step 6: Place the eyes and the cheeks under the eyes, sew them using applique stitch. Sew the nose using straight stitches and the mouth using back stitches.

Paso 7: Para hacer el brillo de ojos, utilizamos una pequeña puntada recta en cada ojo. Coser la nube usando puntada para apliques y transferir la boca y ojos con un marcador de tinta invisible.
Step 7: To make the shine in the eyes, sew an small horizontal straight stitch. Sew the cloud using applique stitch, transfer the eyes and mouth with a disappearing ink marker.

Paso 8: Para hacer los ojos de la nube usamos puntada de saten, coser la boca con punto atrás. Colocar el globo y coser utilizando puntada para apliques.
Step 8: To make the eyes in the cloud use satin stitch and the mouth using back stitch. Place the balloon and sew it using applique stitch.

Paso 9: Dibujamos una línea curvada con un marcador de tinta invisible, cosemos sobre la línea utilizando punto atrás, colocar y coser las flores con puntada para apliques.
Step 9: Draw a wavy line with a disappearing ink marker, sew over the line using back stitch, sew the flower using applique stitch.

Paso 10: Cortar una tira de fieltro de 85 cm de largo y 4 cm de ancho.
Step 10: Cut a strap of felt 33.5 inches long and 1.5" width.

Paso 11: Colocar la correa en la parte trasera de la bolsa, sujetarla con alfileres y coserla usando punto atrás.
Step 11: Place the strap in the bag back piece, pin it and sew it using back stitch.

Paso 12: Coser las esquinas en la tela que vamos a usar de revestimiento de la bolsa.
Step 12: Overcast stitch the darts on the fabric lining.

Paso 13: Colocar el revestimiento en su lugar y sujetarlo con alfileres, doblar la orilla y coser usando punto atrás.
Step 13: Place the lining fabric and pin it, fold the hem and sew it using back stitch.

Paso 14: Coser usando punto atrás.
Step 14: Sew using back stitch.

Paso 15: Colocar el frente de la bolsa sobre la parte trasera de la bolsa y sujetar con alfileres.
Step 15: Place the bag front onto bag back piece and pin it.

Paso 16: Usando punto de festón coser alrededor de la bolsa.
Step 16: Using Blanket Stitch sew around the bag.

Paso 17: Meter el fondo de la bolsa como se muestra en la imagen.
Step 17: Tuck the bottom of the bag as shown in the picture.

Paso 18: Aplicar rubor para hacer las chapitas de la nube. Coser el remache.
Step 18: Add pink blush to make the cheeks in the cloud. Sew on the snap.

Paso 19: Pegar un botón sobre la costura del broche para que esta no se vea, al botón le puedes amarrar hilo para que de la impresión de que fue cosido.
Step 19: Glue a button in the snap sewing so that is not seen, you can string the button so it looks like it is sewn.

Paso 20: Pegar una flor en la parte interior de la bolsa donde está la costura del remache para que esta no se vea.
Step 20: Glue a flower in the inside of the bag where the snap sewing is, so it won't be seen.


Espero les haya gustado, recuerden que me pueden encontrar en Instagram y en Facebook. Hasta pronto! xx
Awesome! Thanks for the tutorial!
ResponderBorrarKisses!
I'm very happy you like it! ♥ Kisses!
BorrarThank you!! So cute! (from Brazil)
ResponderBorrarHello!!! Thank you for your comment ♥
Borrar